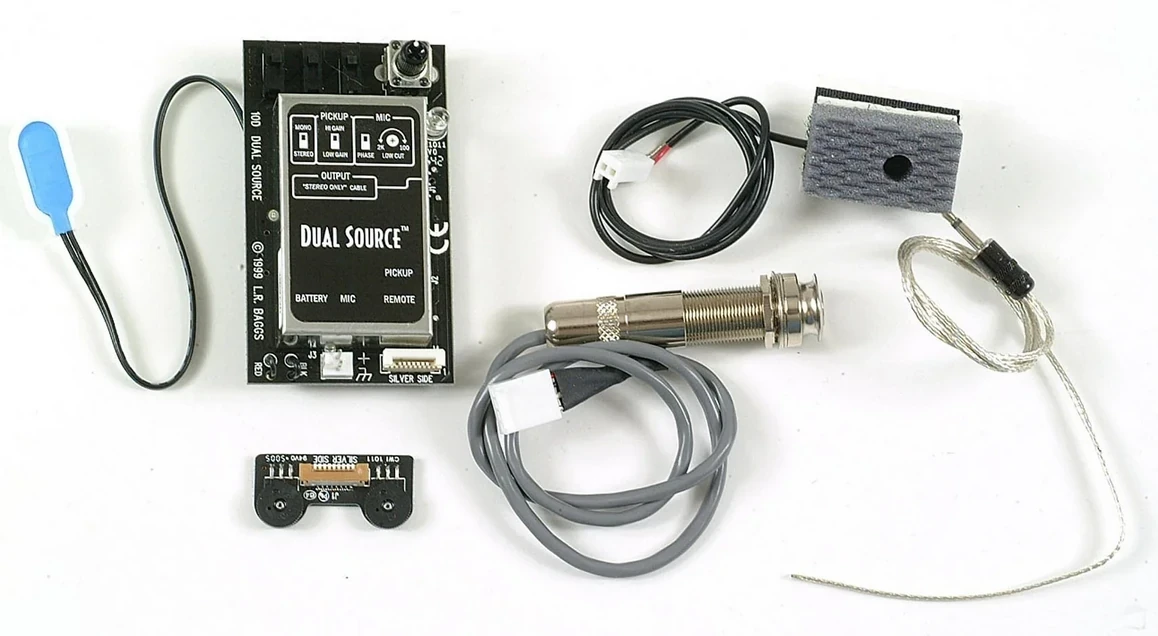
LR Baggs HiFi Duet

Introduction

This brief article is based upon my own personal experience with the LR Baggs HiFi Duet pickup.

I am not paid for my opinion on this product, nor has it been supplied to me for free. This is not an advertisement. I am sharing what I know as a courtesy to you, the reader.

When I encounter a quality product and am able to successfully demonstrate its value, I often become enthusiastic. Please don't mistake my genuine enthusiasm for some cheap attempt at marketing.

A Little Background

I'd love to be able to say that as soon as the LB6 was released, I installed it in one of my guitars. But that is not the case. I started with the Element, when it was released. I lost count of how many of these pickups I installed over the decades. I did eventually get a couple of LB6's, but that was a few years later. They sounded a bit too "hot" for my taste, very reminiscent of the Barcus Berry pickups I had been using, prior to discovering the Element UST.

As the company introduced new products, I would acquire them. I have used every version of pickup that LR Baggs has ever sold, be it in my own personal guitars, my clients guitars, or guitars I have made for others. I won't list them all here, but when I say "every version", I really do mean all of them. If that qualifies me as a Baggs fanboy, then so be it.

The iBeam, iMix (iBeam with Element), and the Lyric all found homes in one guitar or another, as did the various versions of the Element, the onboard ("barn door") preamps, and the magnetics (M1, M1 Active, M80).

Cozad Guitars - LR Baggs Dual Source pickup

Of all the models, my personal favorite for stage performance was the Dual Source, which combined a condenser mic with the Element UST, and added an onboard preamp, along with a separate volume wheel and blend wheel. While it was a bit prone to feedback, it sure made my guitars sound good through the PAs.

For me, a close second to the Dual Source was the Anthem. In my opinion, while the Anthem never quite shared that same high fidelity output of the Dual Source, it remained a rock-solid, consistent performer on the stage. I still have several guitars outfitted with the Anthem.

But I stumbled in my Baggs devotion. Upon its release, I skipped over the Baggs HiFi. I wasn't that impressed with the sound. To be fair, I had plenty of options (and inventory) that competed nicely in that same soundspace, and I wasn't looking for something new. However, when the Silo Mic was announced, and the HiFi Duet was made available for pre-sale, I jumped back onboard the Baggs train. And I am glad I did.

I wanted to briefly share my experience with LR Baggs pickups so that, when I tell you that the HiFi Duet displaced the Dual Source as my favorite Baggs pickup, you will understand the significance of my statement.

The HiFi part

The LR Baggs HiFi pickup system utilizes a pair of bridgeplate sensors, similar to the Trance Amulet, and the Dazzo. They should be positioned directly beneath the saddle, along the saddle line, with one sensor being centered between the 1st and 2nd strings, and the other sensor centered between the 5th and 6th strings.

The pickups are designed to be attached using the provided 3M™ double-stick adhesive. This requires the surface they are attached to to be smooth and clean. Baggs recommends wiping things down with alcohol. To any of you Shellac'ers out there, proceed with caution, remembering that famous last word: "Oops!".
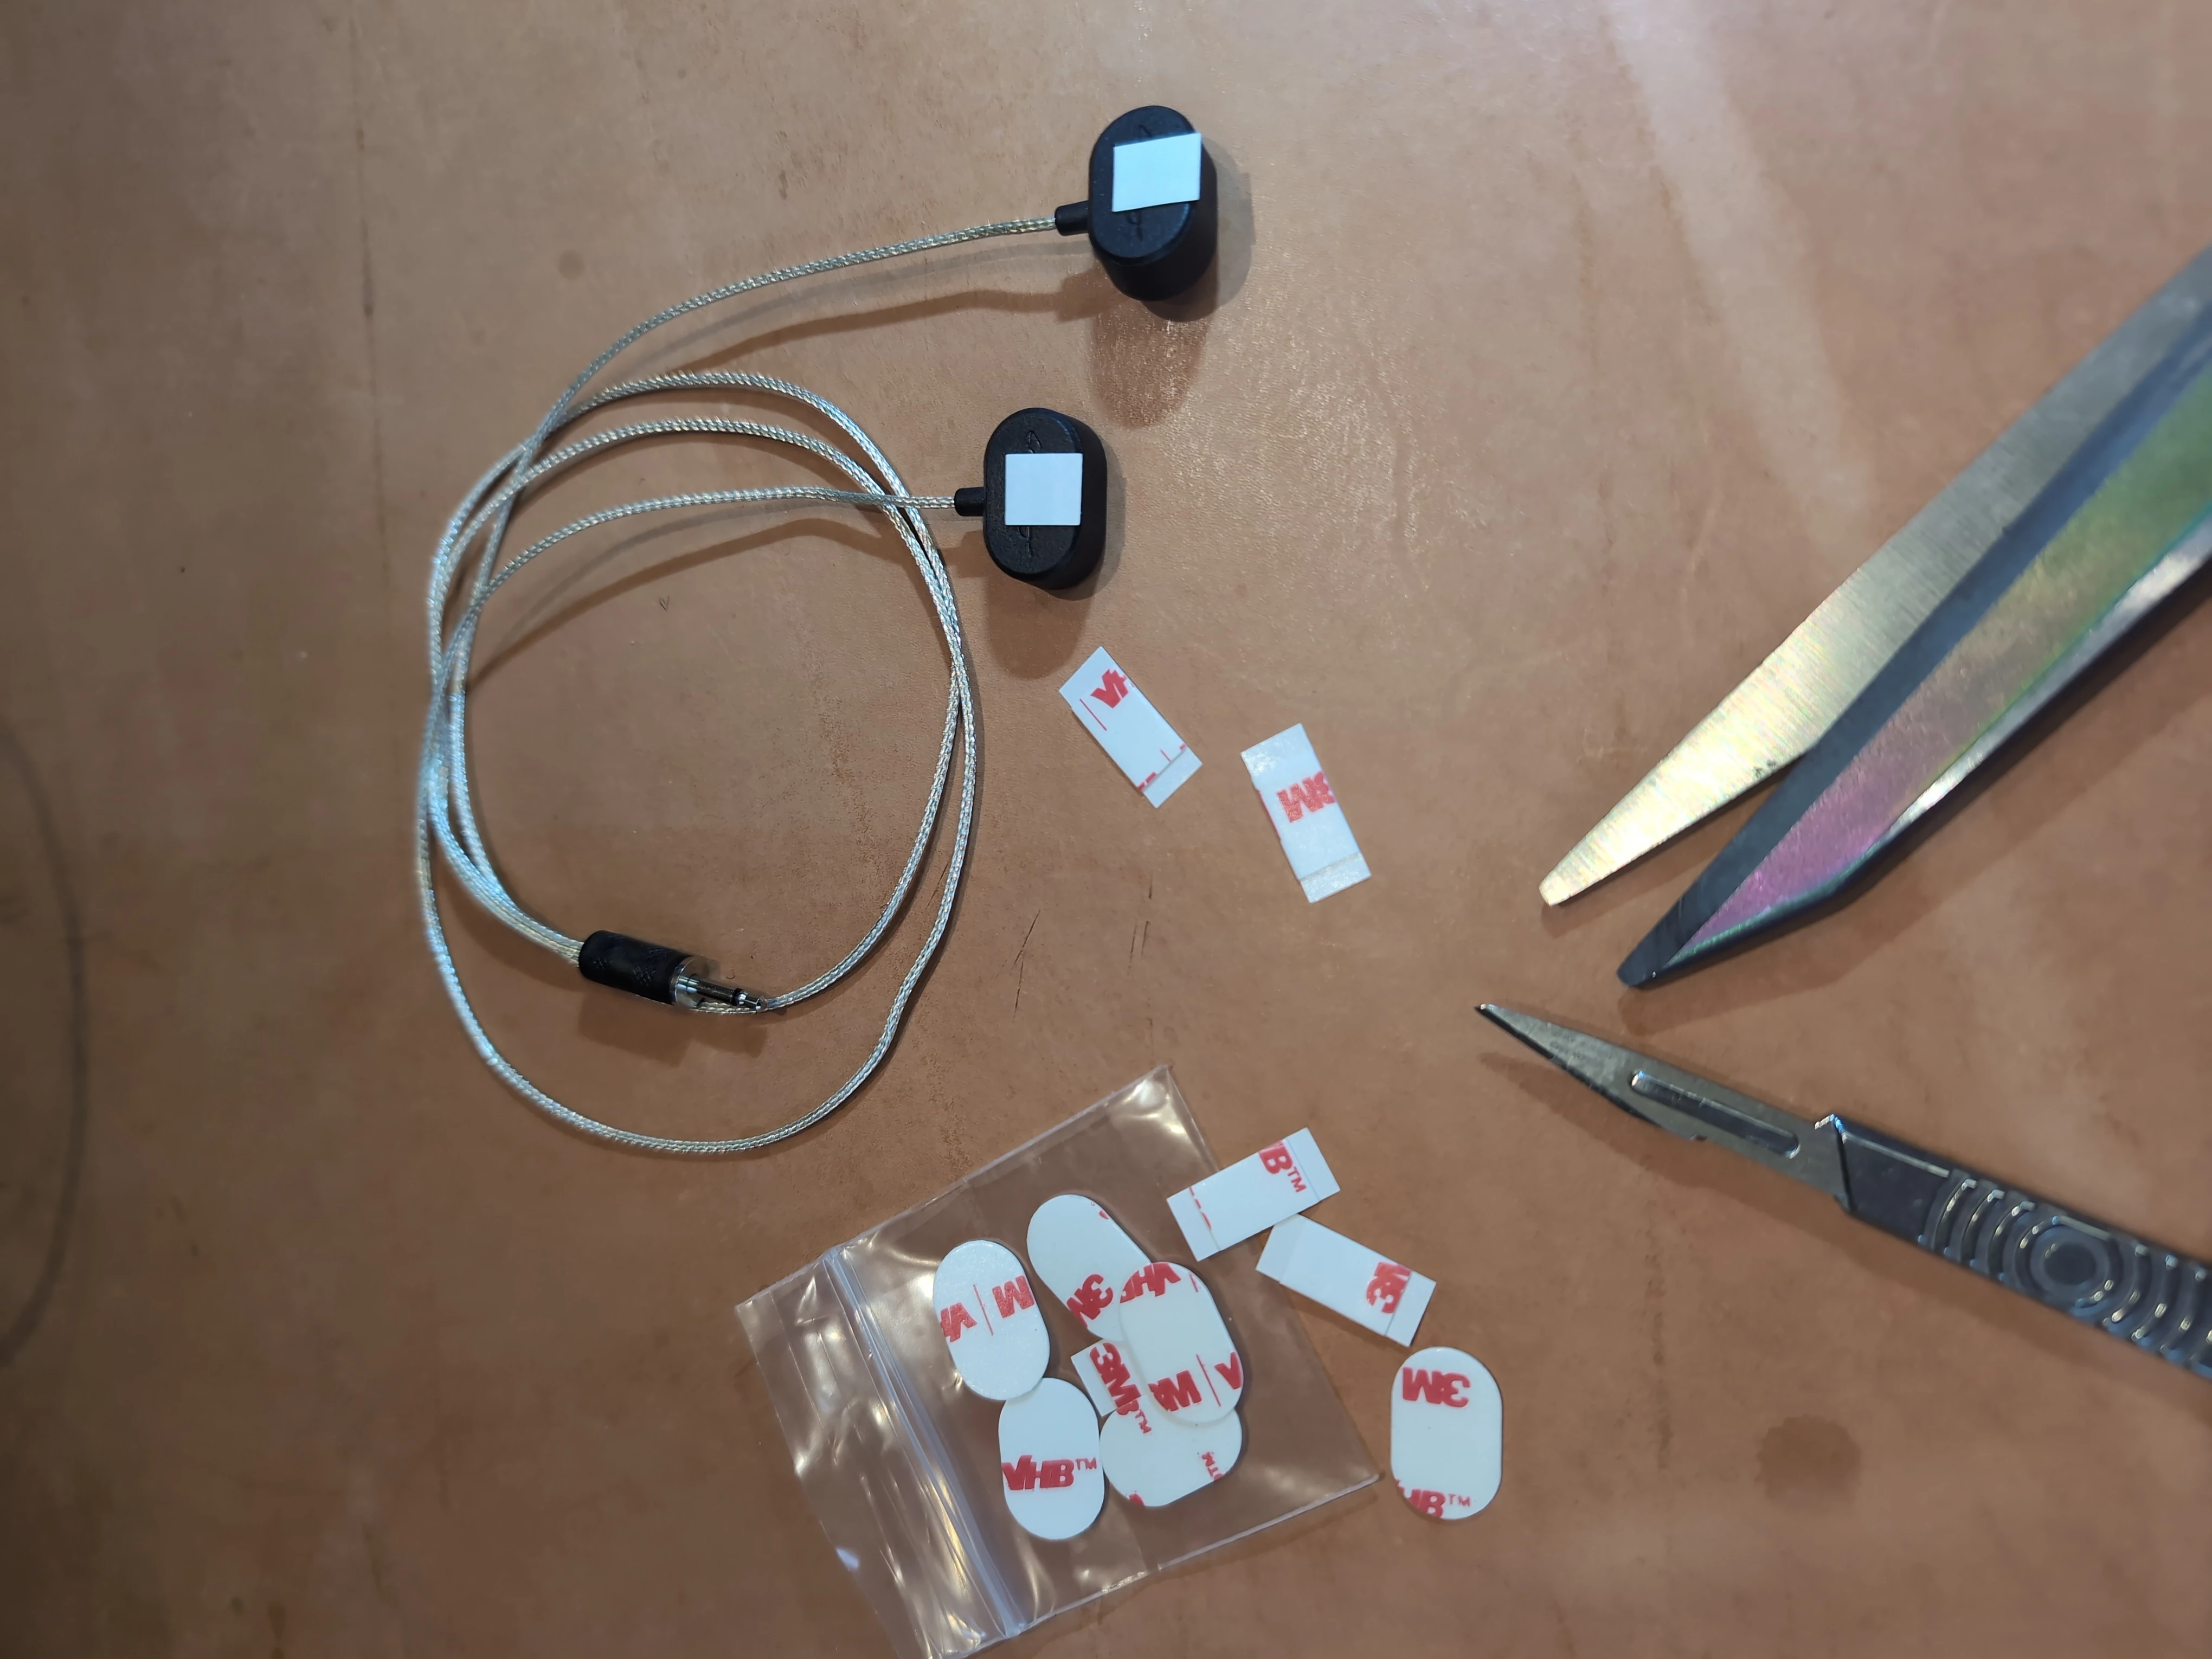
The manufacturer provides a plastic installation jig/fixture that works with most 6-string guitars having bridge pins. A small adhesive patch is applied by you, the installer, to the tops of the sensors in order to temporarily hold them to the fixture during installation.

TIP: My practice is to cut the supplied small rectangular adhesive tapes in half, as I need to be able to release the fixture from the sensors after they are installed. I have found that a small square piece is adequate.

Cozad Guitars - LR Baggs HiFi Sensors with Tape

The plastic installation fixture features three components: the plate, two posts, and two nuts. The nuts ride in a slot on the underside of the plate to accommodate varying string (bridge pin hole) spacing. The molded collar on each threaded post pinches the plate against the nut as the posts are tightened. It is a well-thought out design and works for most installations without modification.

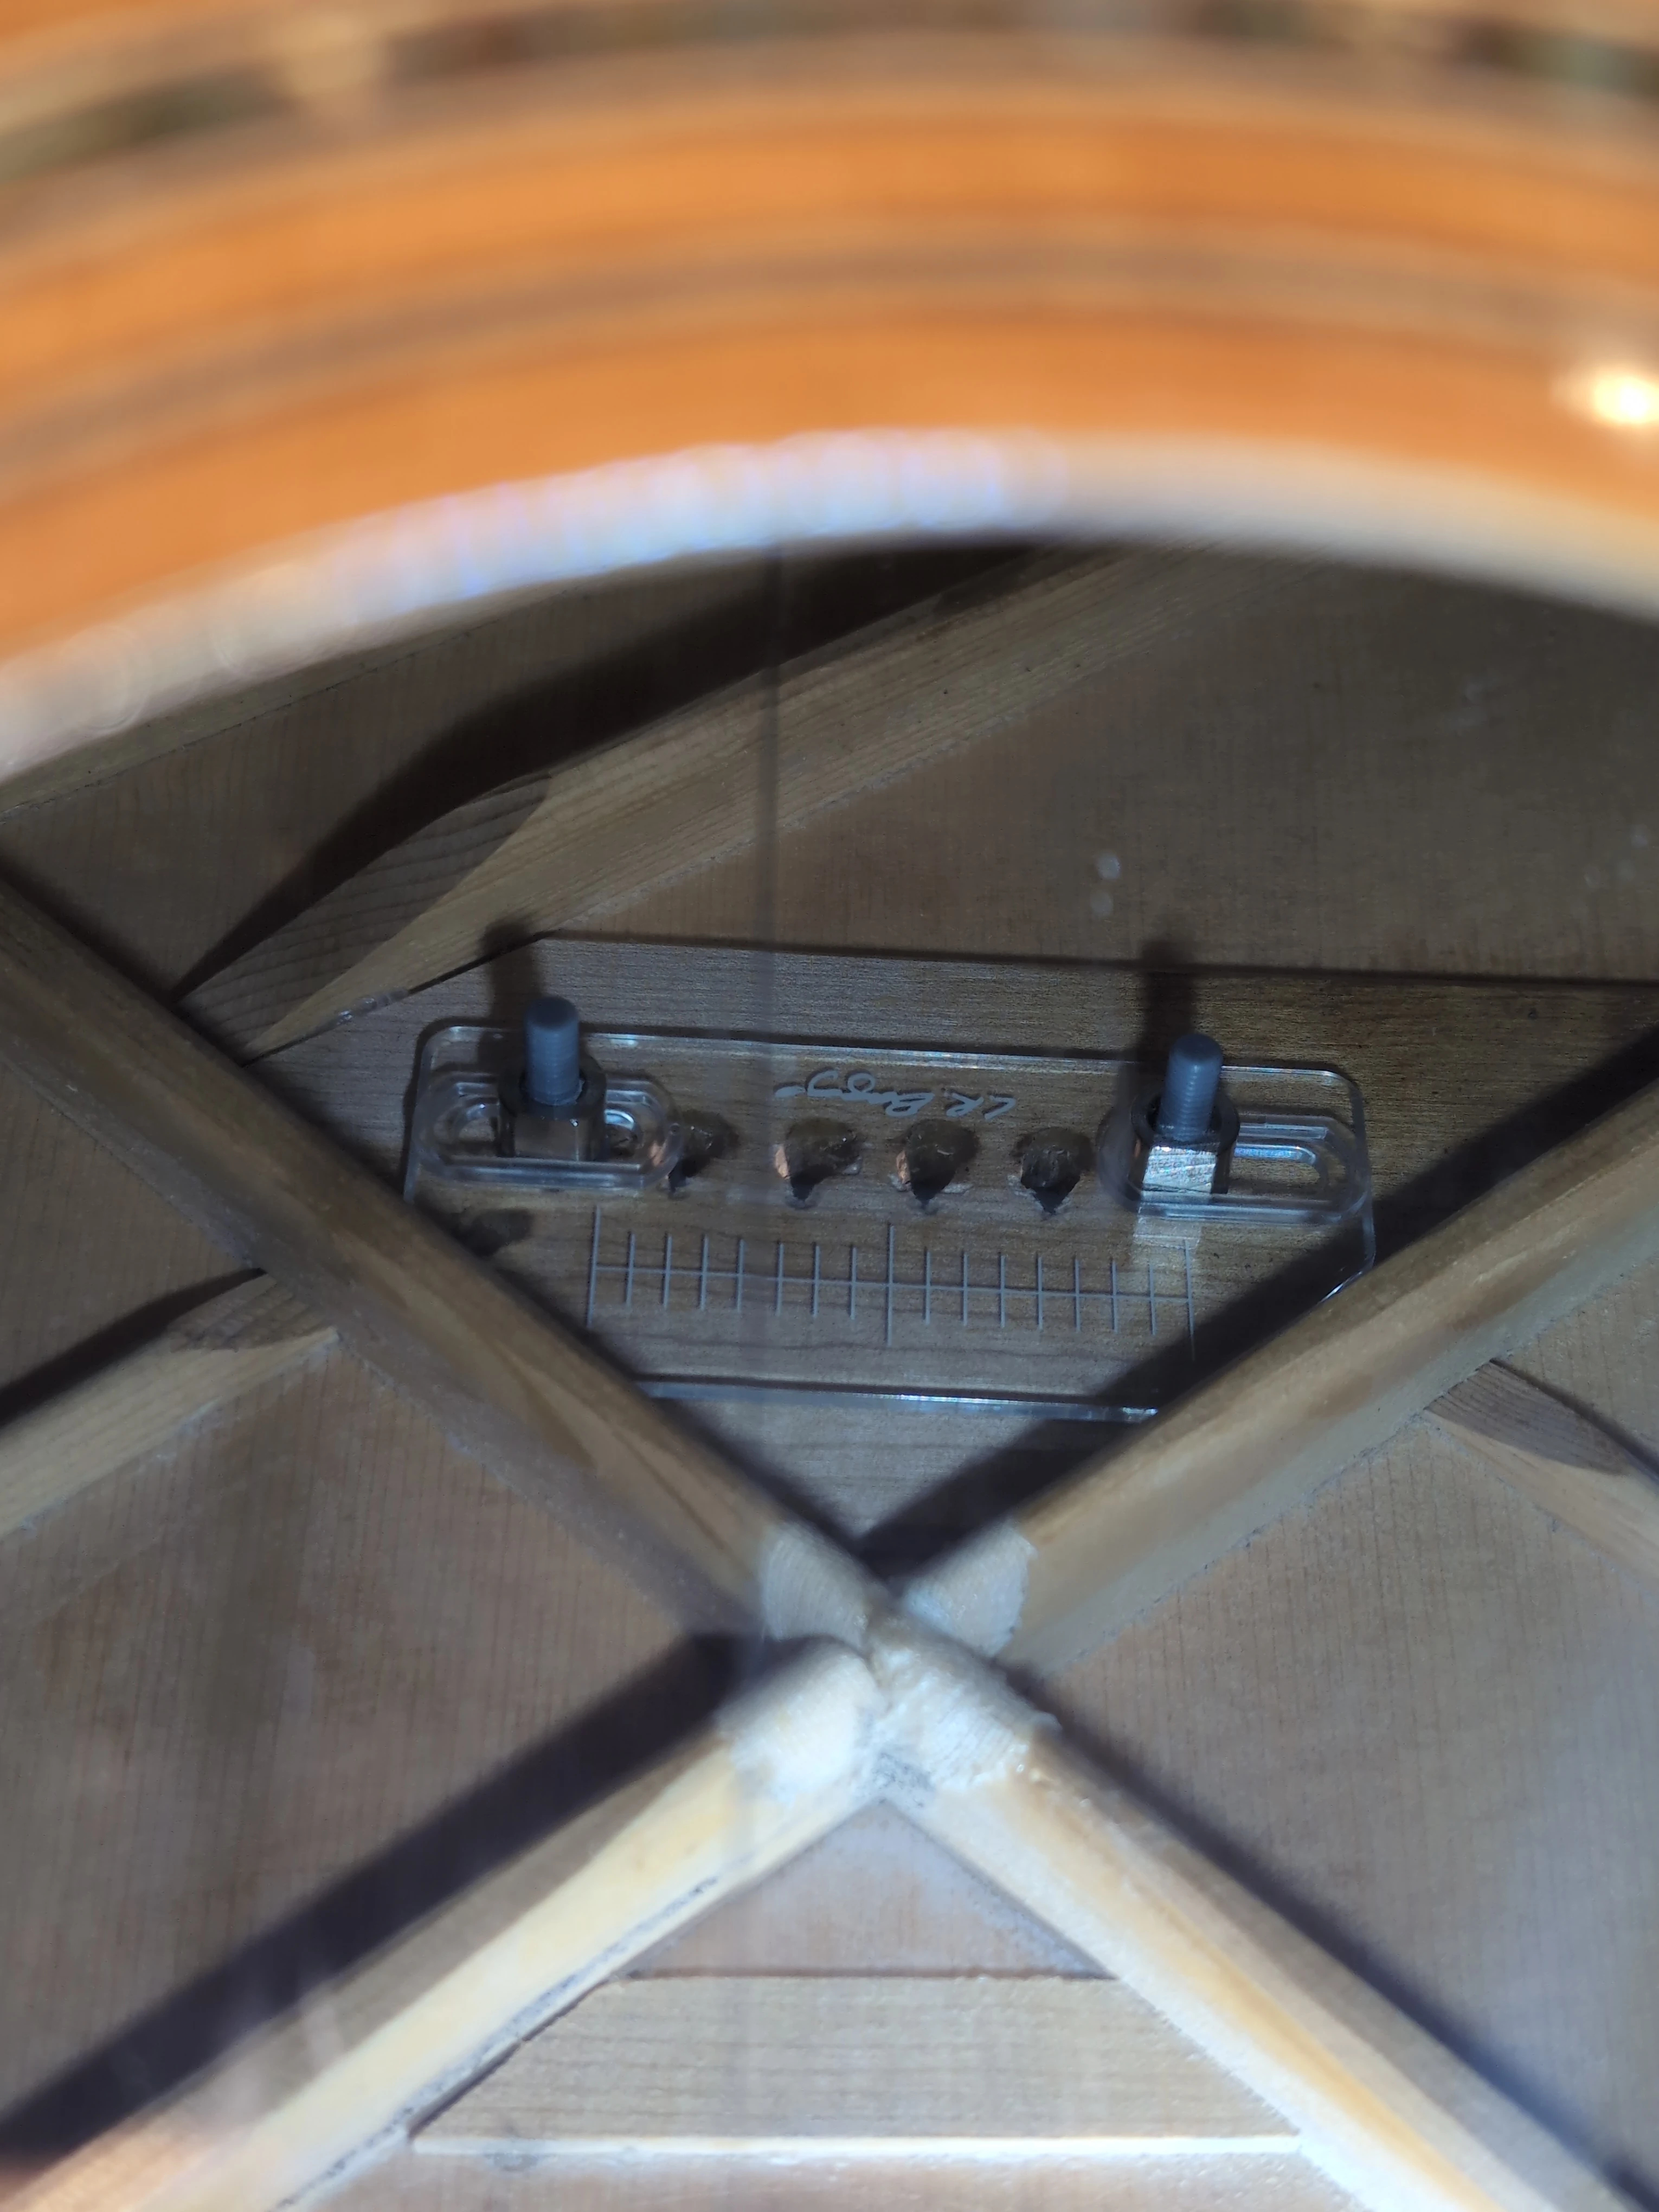
TIP: Tightening the posts secures them against any shifting during installation, letting you precisely locate your sensors. BEFORE you tighten them, however, I suggest that you fit the plate up against the bridgeplate with the posts protruding through bridge pin holes one (1) and six (6). Ignore whether the posts are centered on the plate, or not. You can even ignore the etchings on the plate, as they only apply to certain guitar bridge designs. It is most critical that the plate is unobstructed as it rides in its path like an elevator to the bridgeplate (make certain it clears any bracing). On some guitars it may be necessary to remove (file or sand away) some material from the plate to ensure sufficient clearance. Once the plate fits against the bidgeplate, tighten the posts.

Cozad Guitars - LR Baggs HiFi Installation Fixture

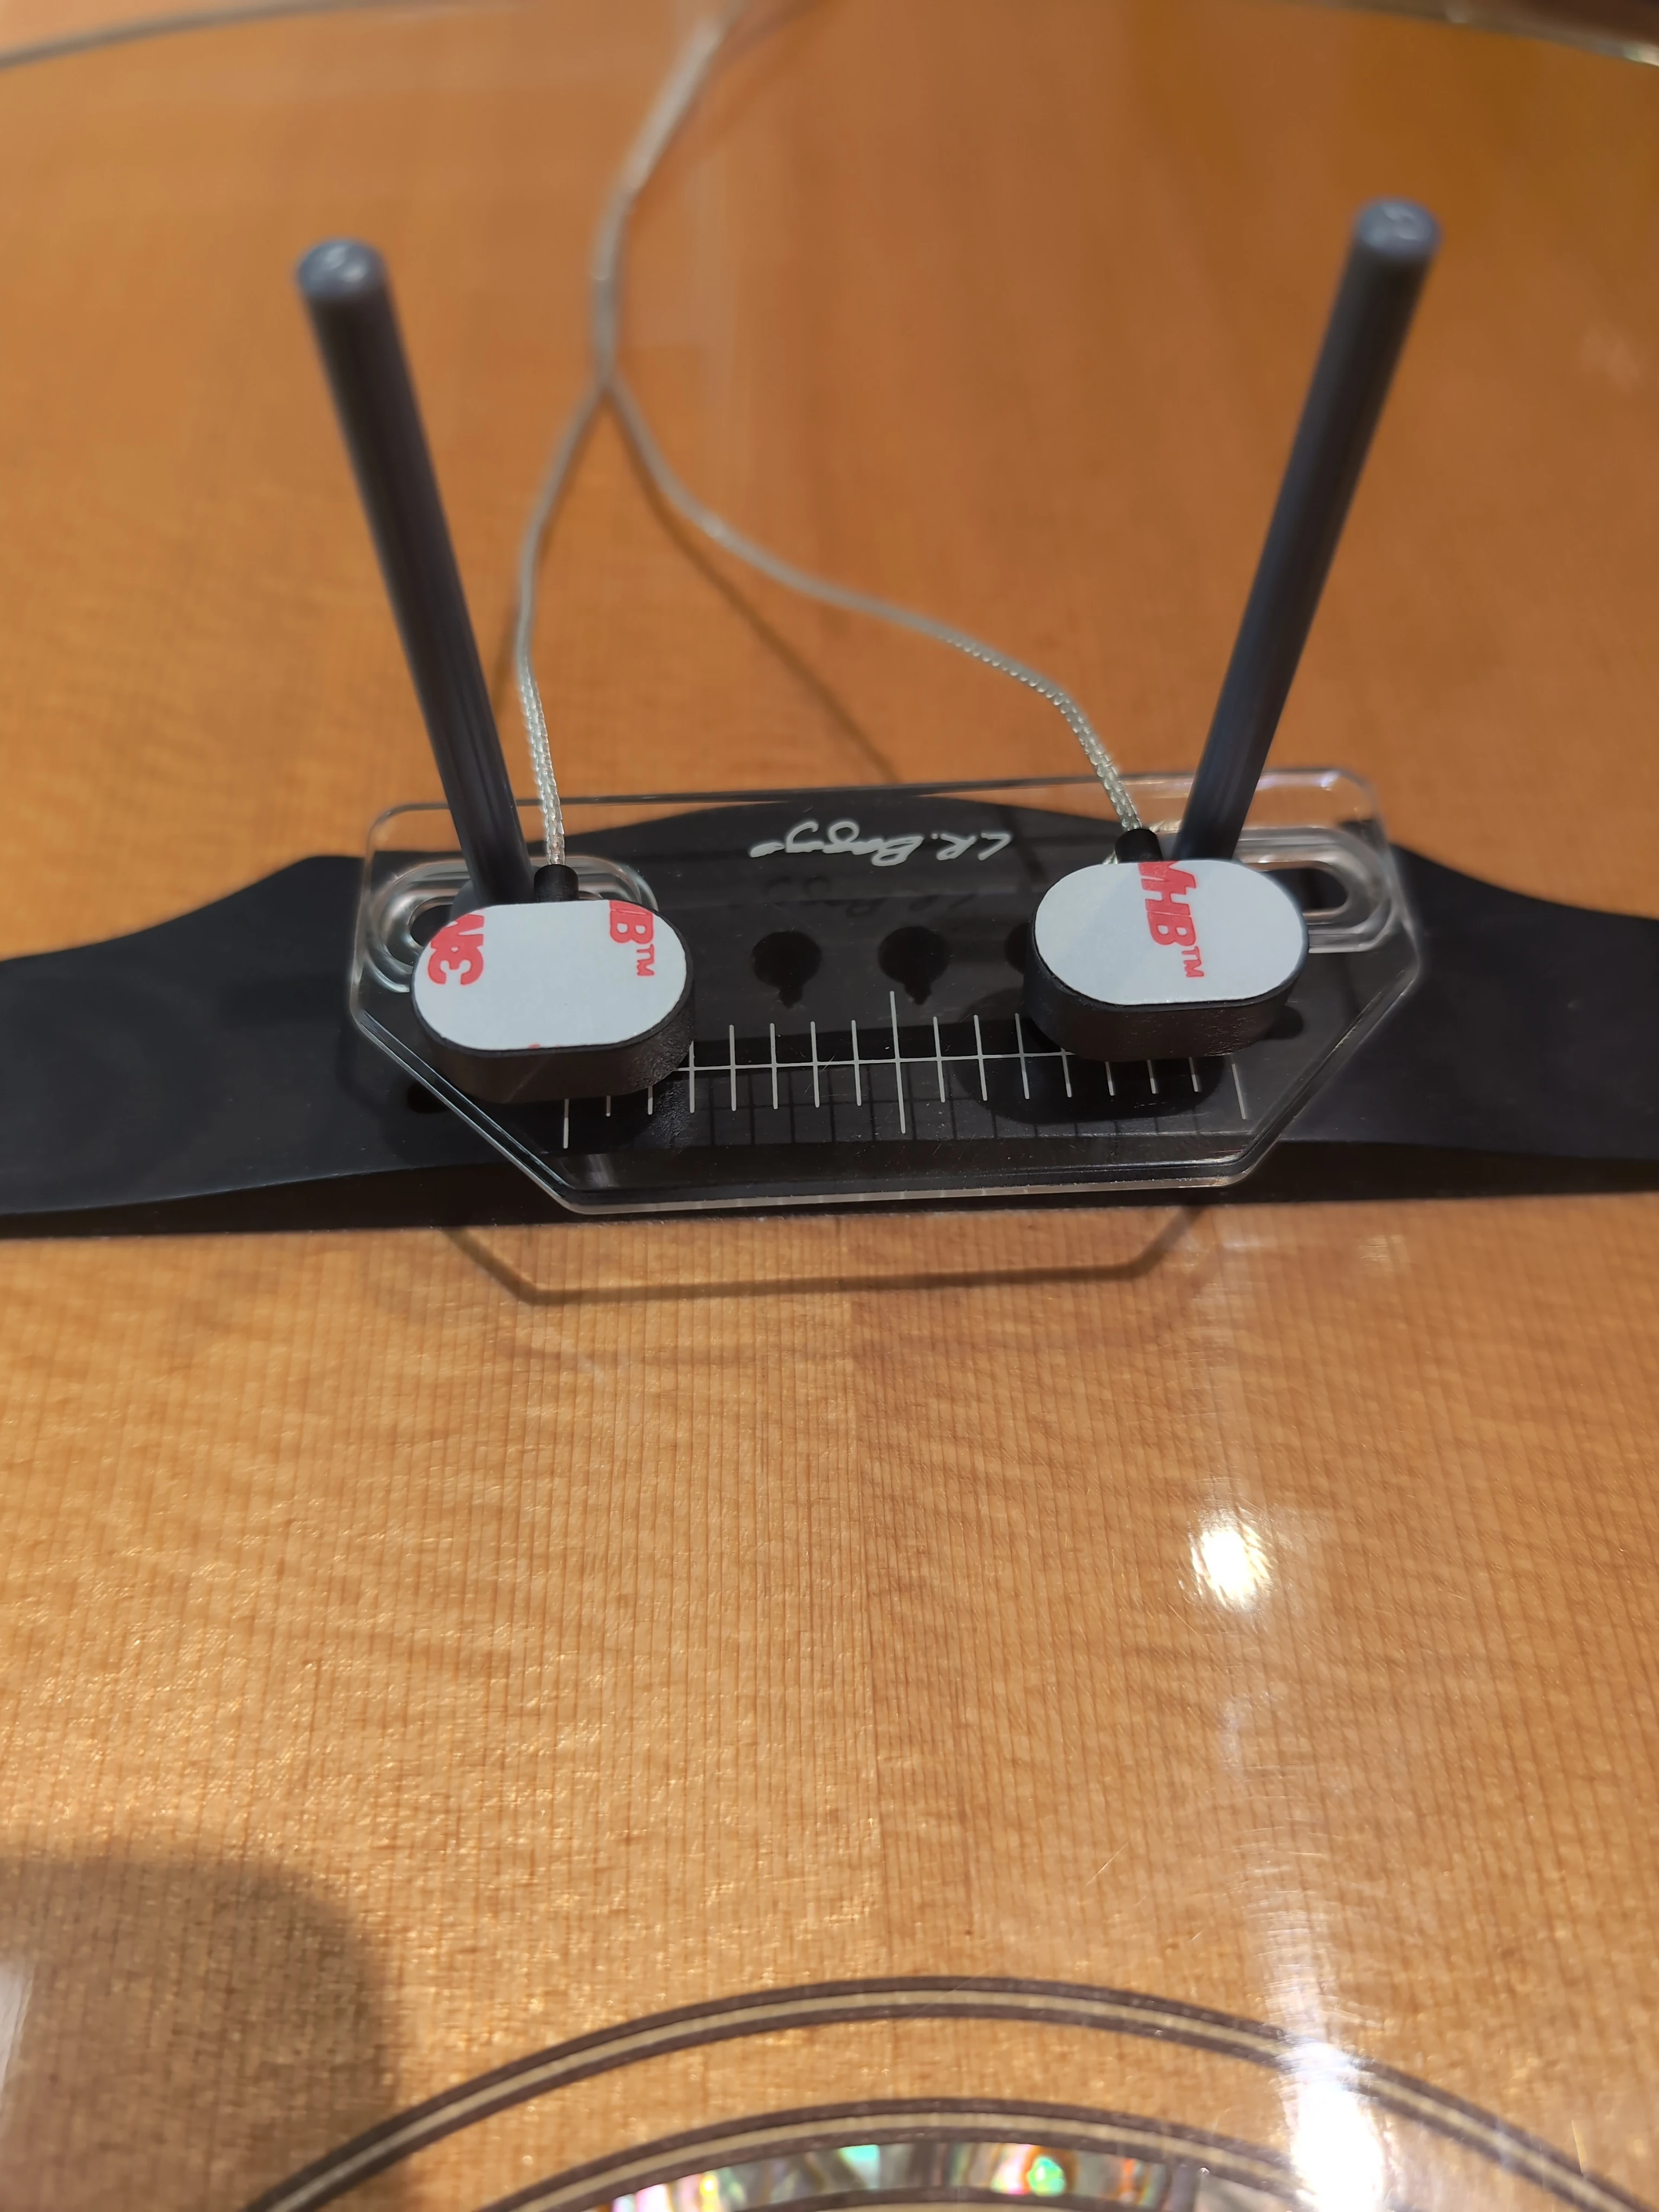
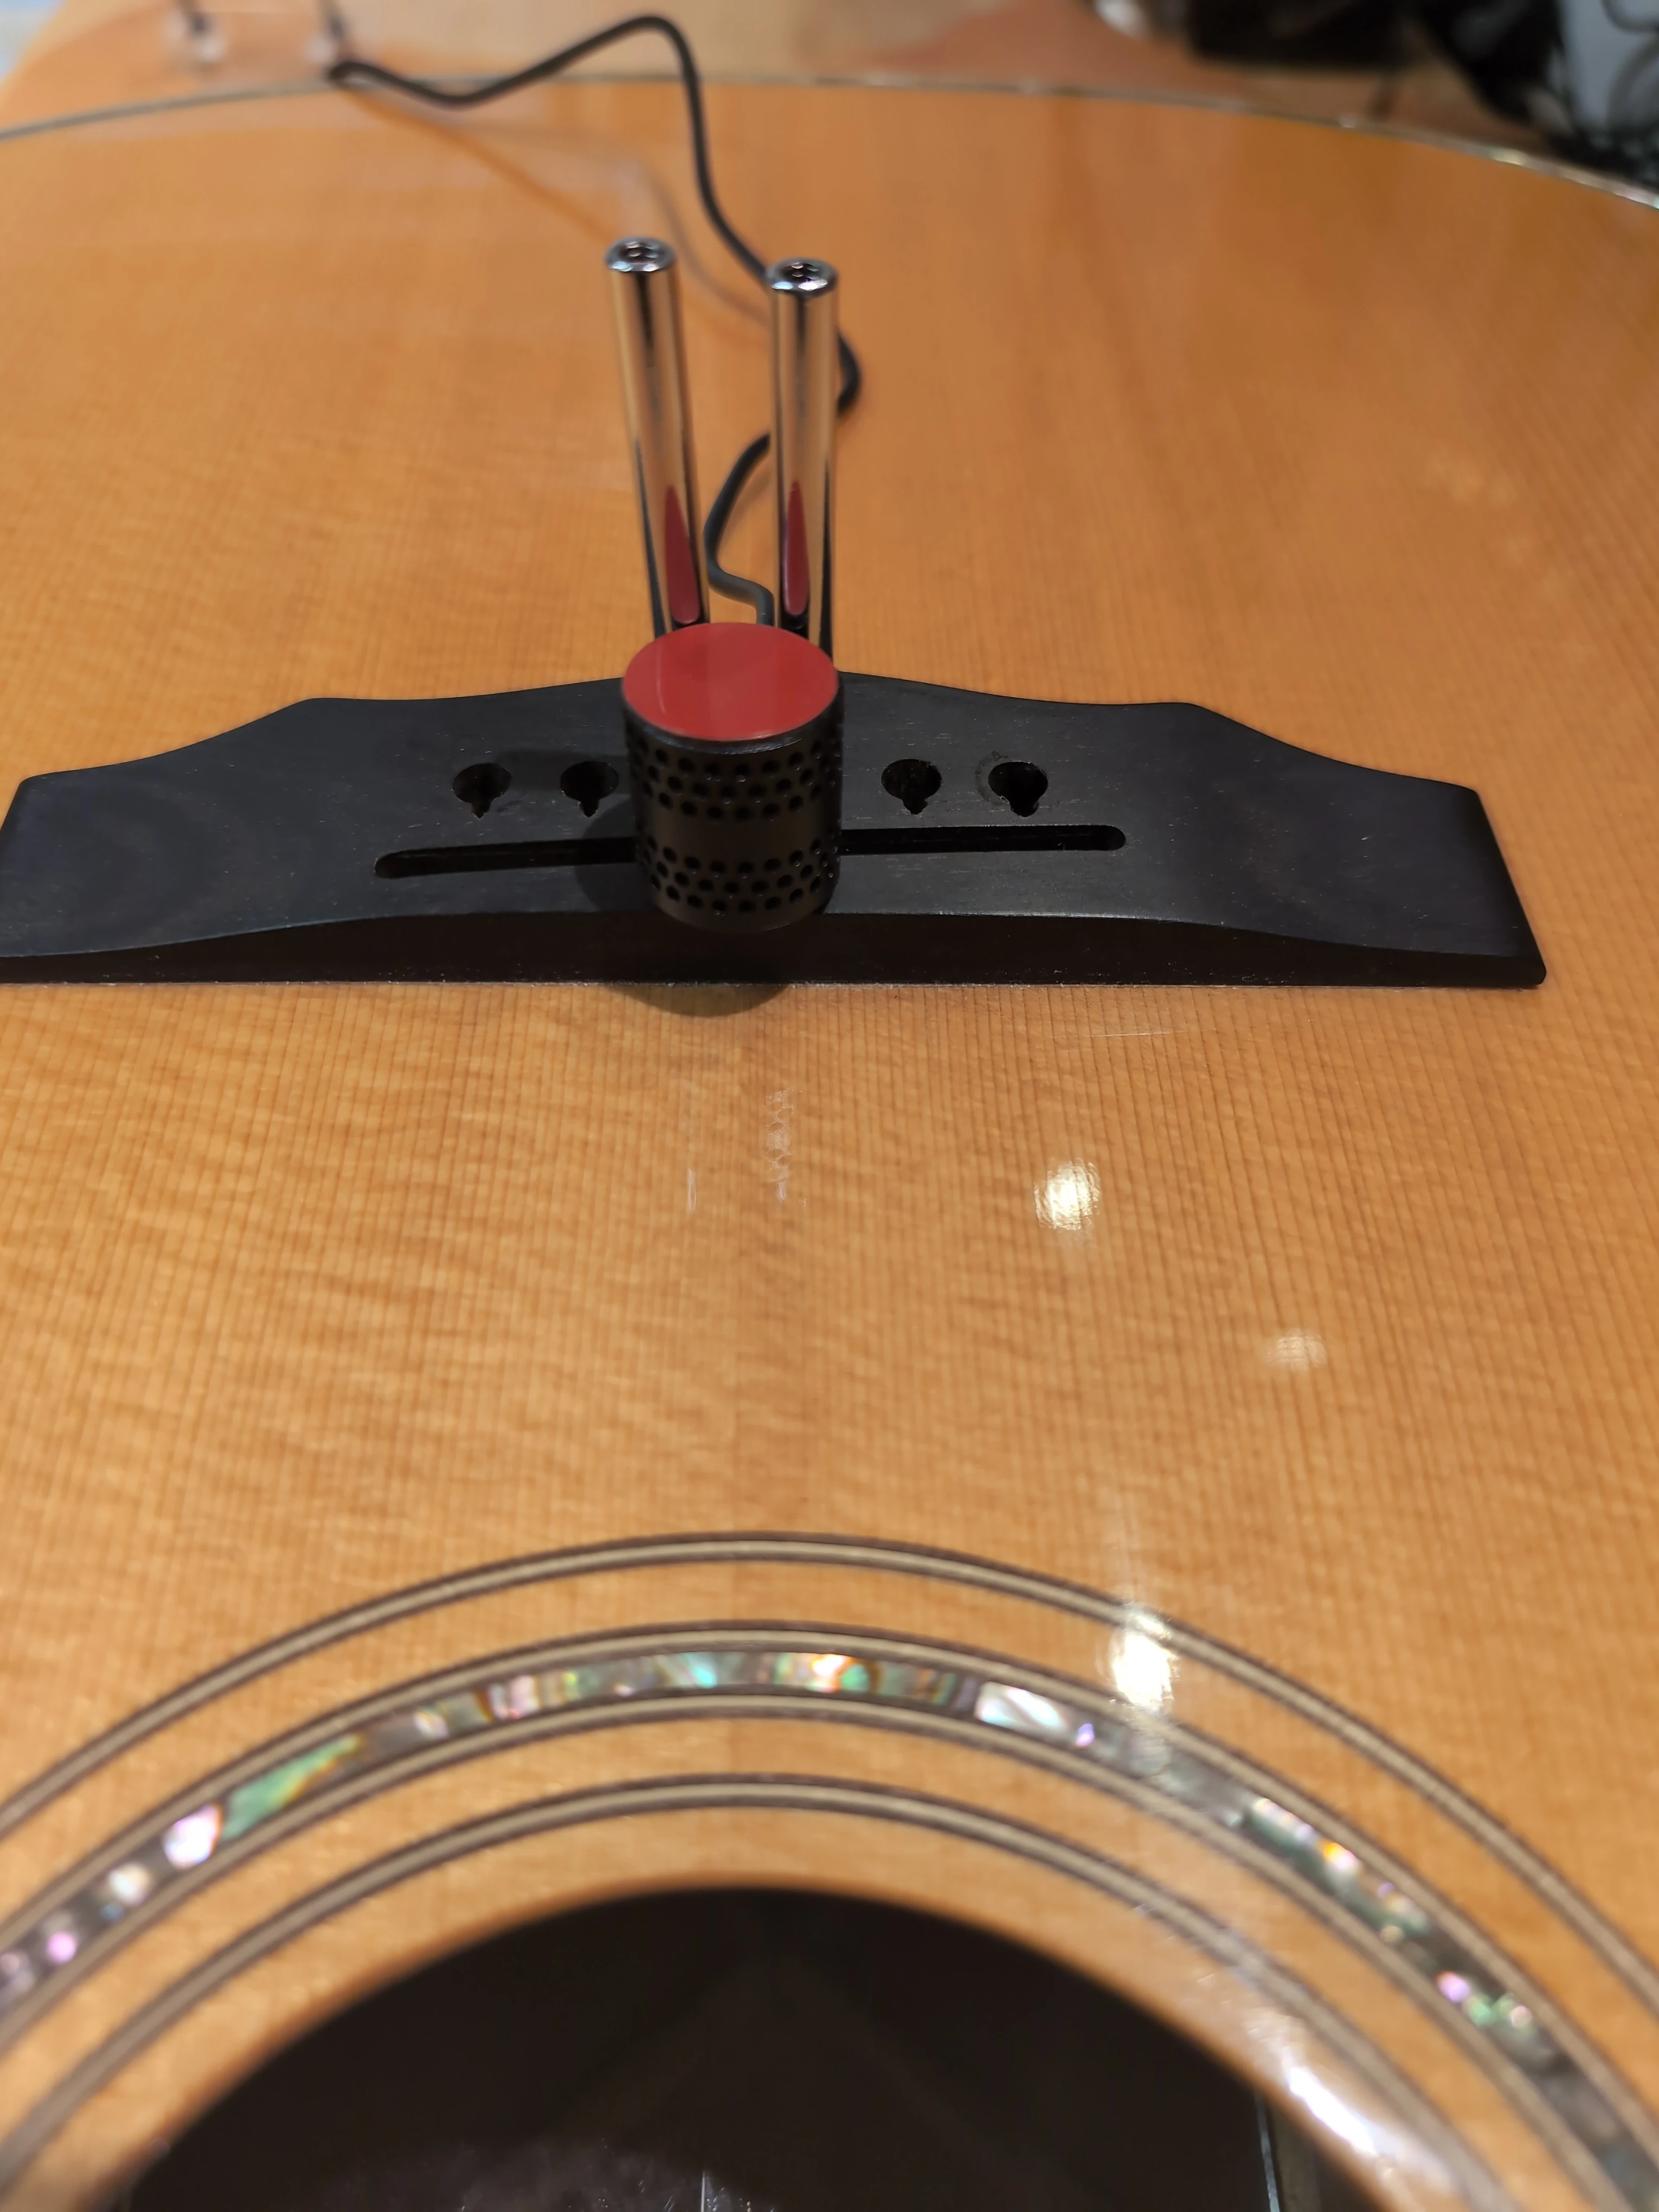
Remove the fixture from inside the guitar, and set it atop the bridge using the same orientation, as shown in the photo below. The posts protrude just enough below the nuts to let you place them in their respective bridge pin holes. The plate is clear plastic, which lets you sight down through it to position the sensors for installation. Note that, due to the bracing placement on this guitar, I cannot "center" the plate (so that the etched centerline falls between the third (3rd) and fourth (4th) strings. It mattereth not, as you will see, shortly.

Cozad Guitars - LR Baggs HiFi Fixture

The sensors should sit over the saddle slot (or just slightly in front of it) with one sensor residing between the first (1st) and second (2nd) strings and t.he other sensor residing between the fifth (5th) and sixth (6th) strings. Run the sensor cables toward the tailblock.

TIP: Position the sensors such that there is sufficient clearance for the ball ends of the strings. Your goal is to avoid physical contact with the sensors and wires.

Once you know where the sensors are going, remove the film from the tape on the small sacrificial pieces you applied to the tops of the sensors and secure them to the fixture, as shown below.

Cozad Guitars - LR Baggs HiFi Sensors Mounted to Fixture

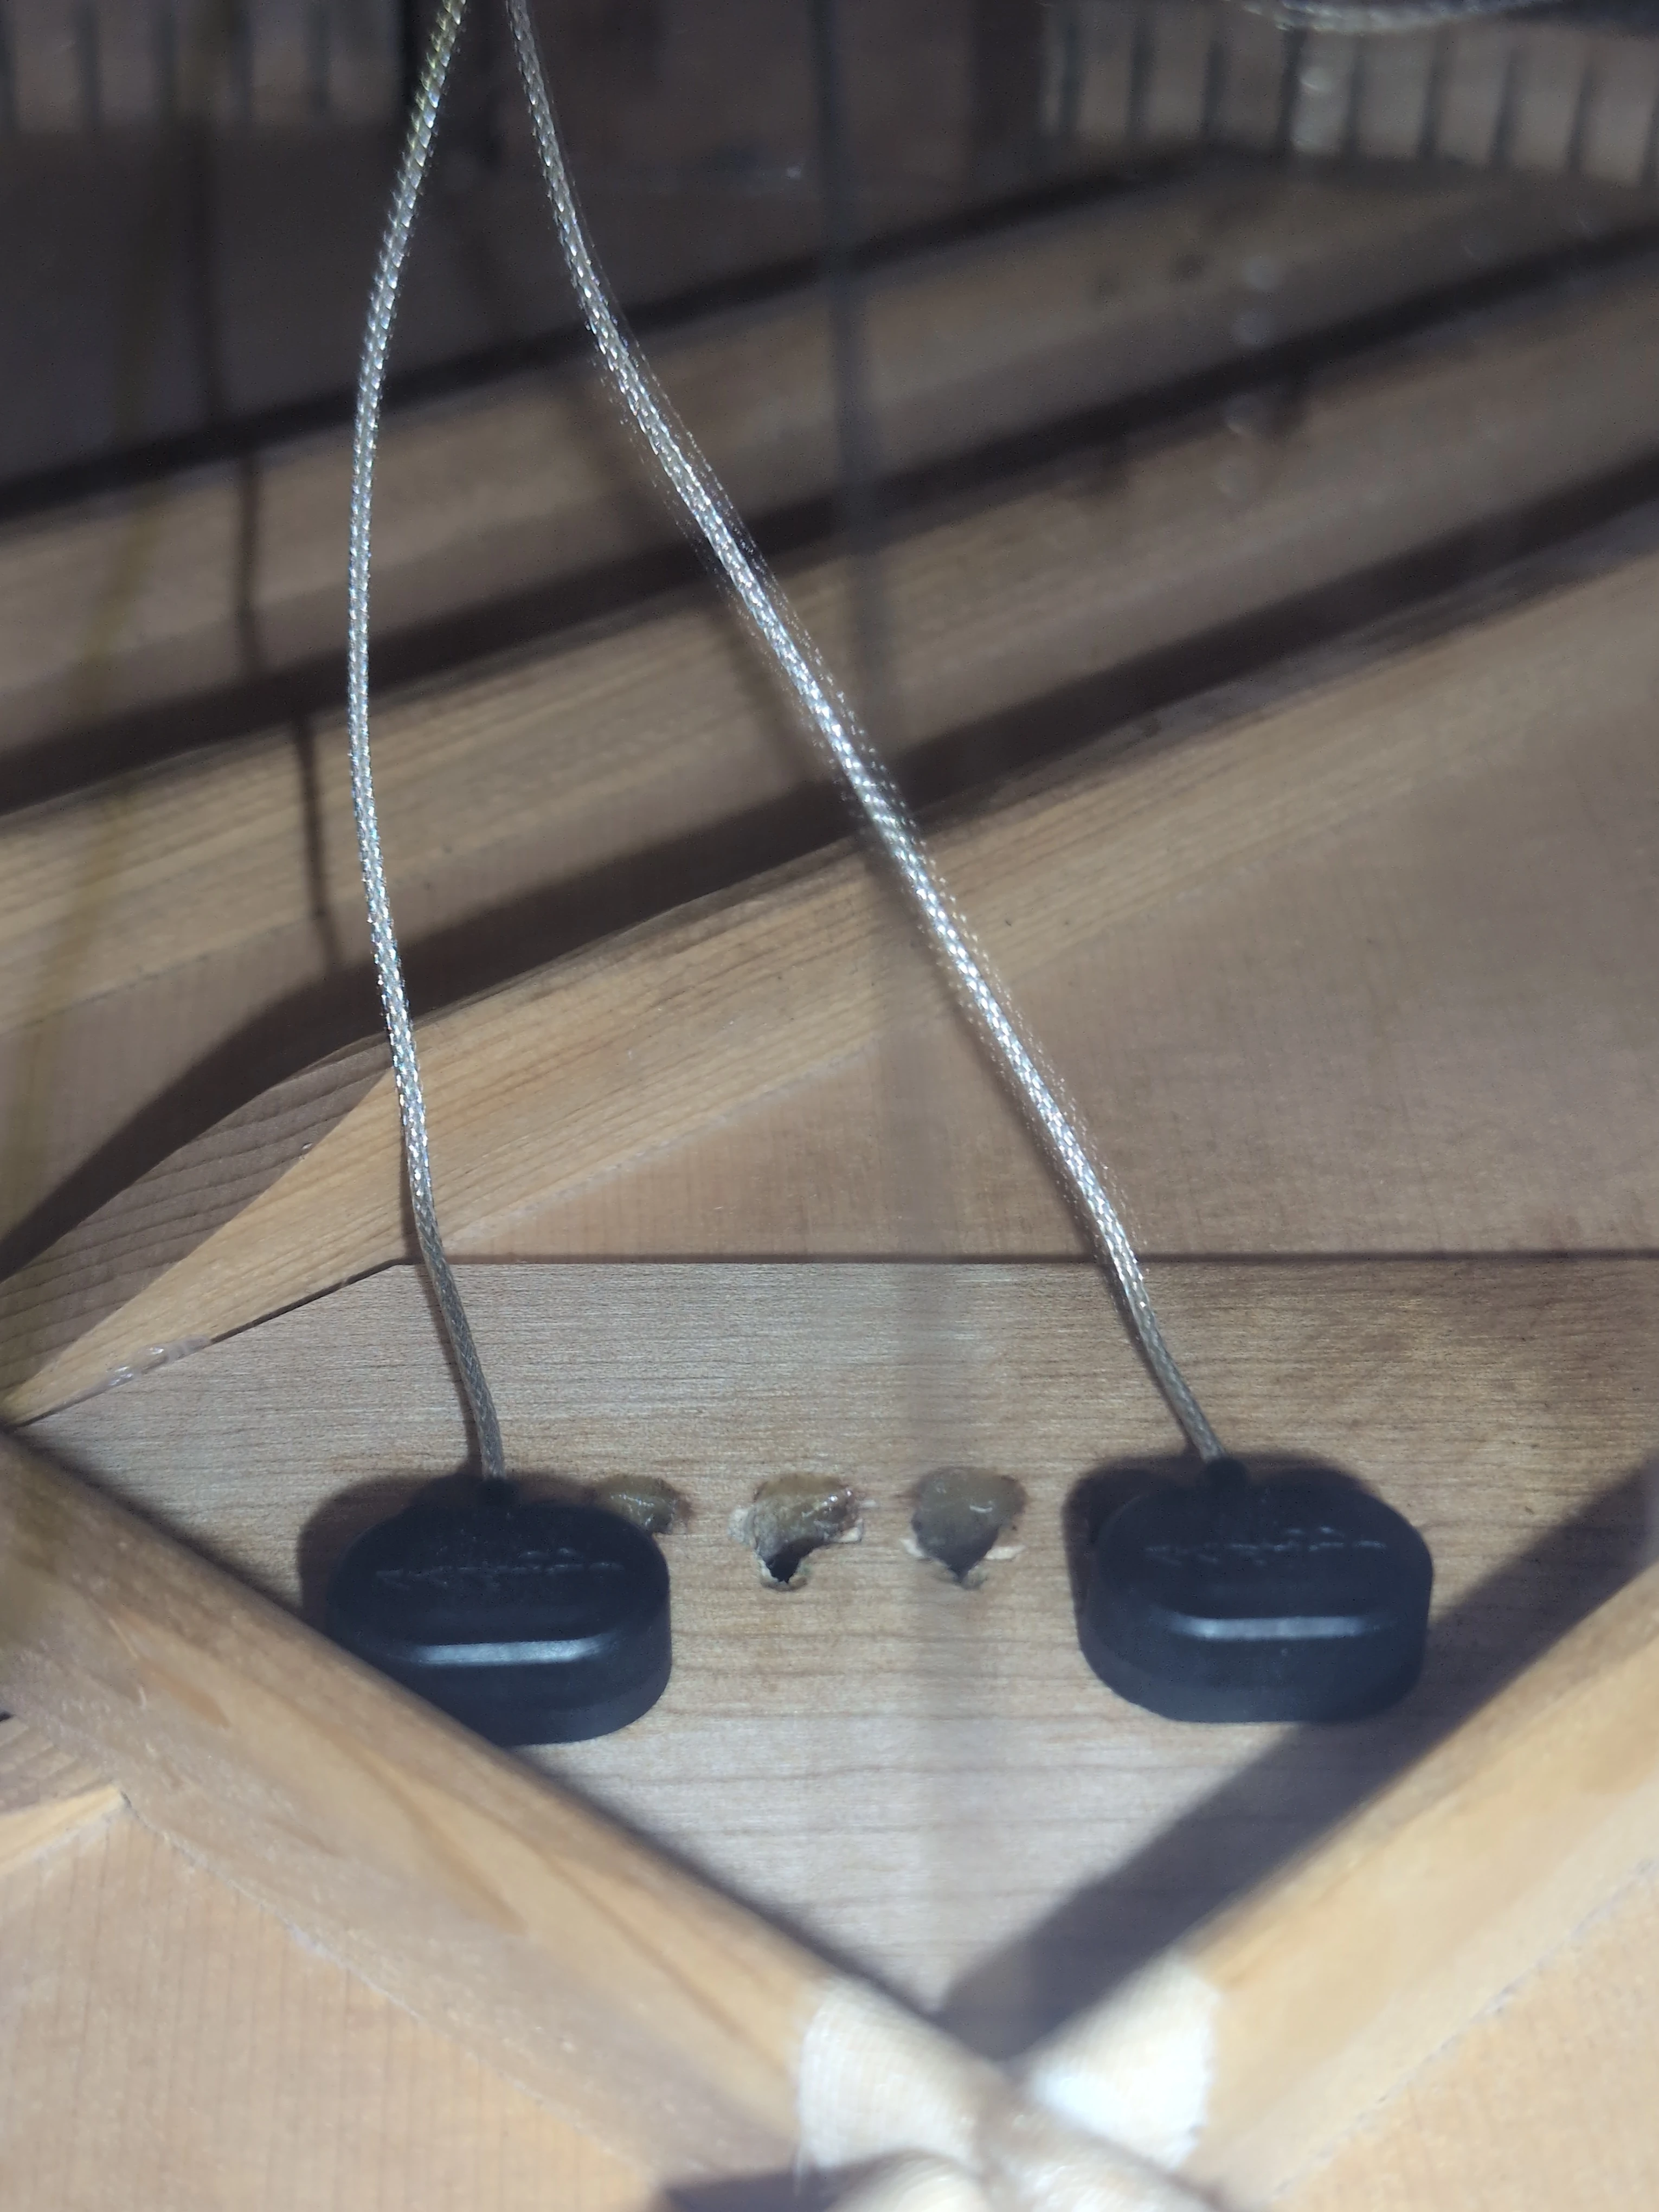
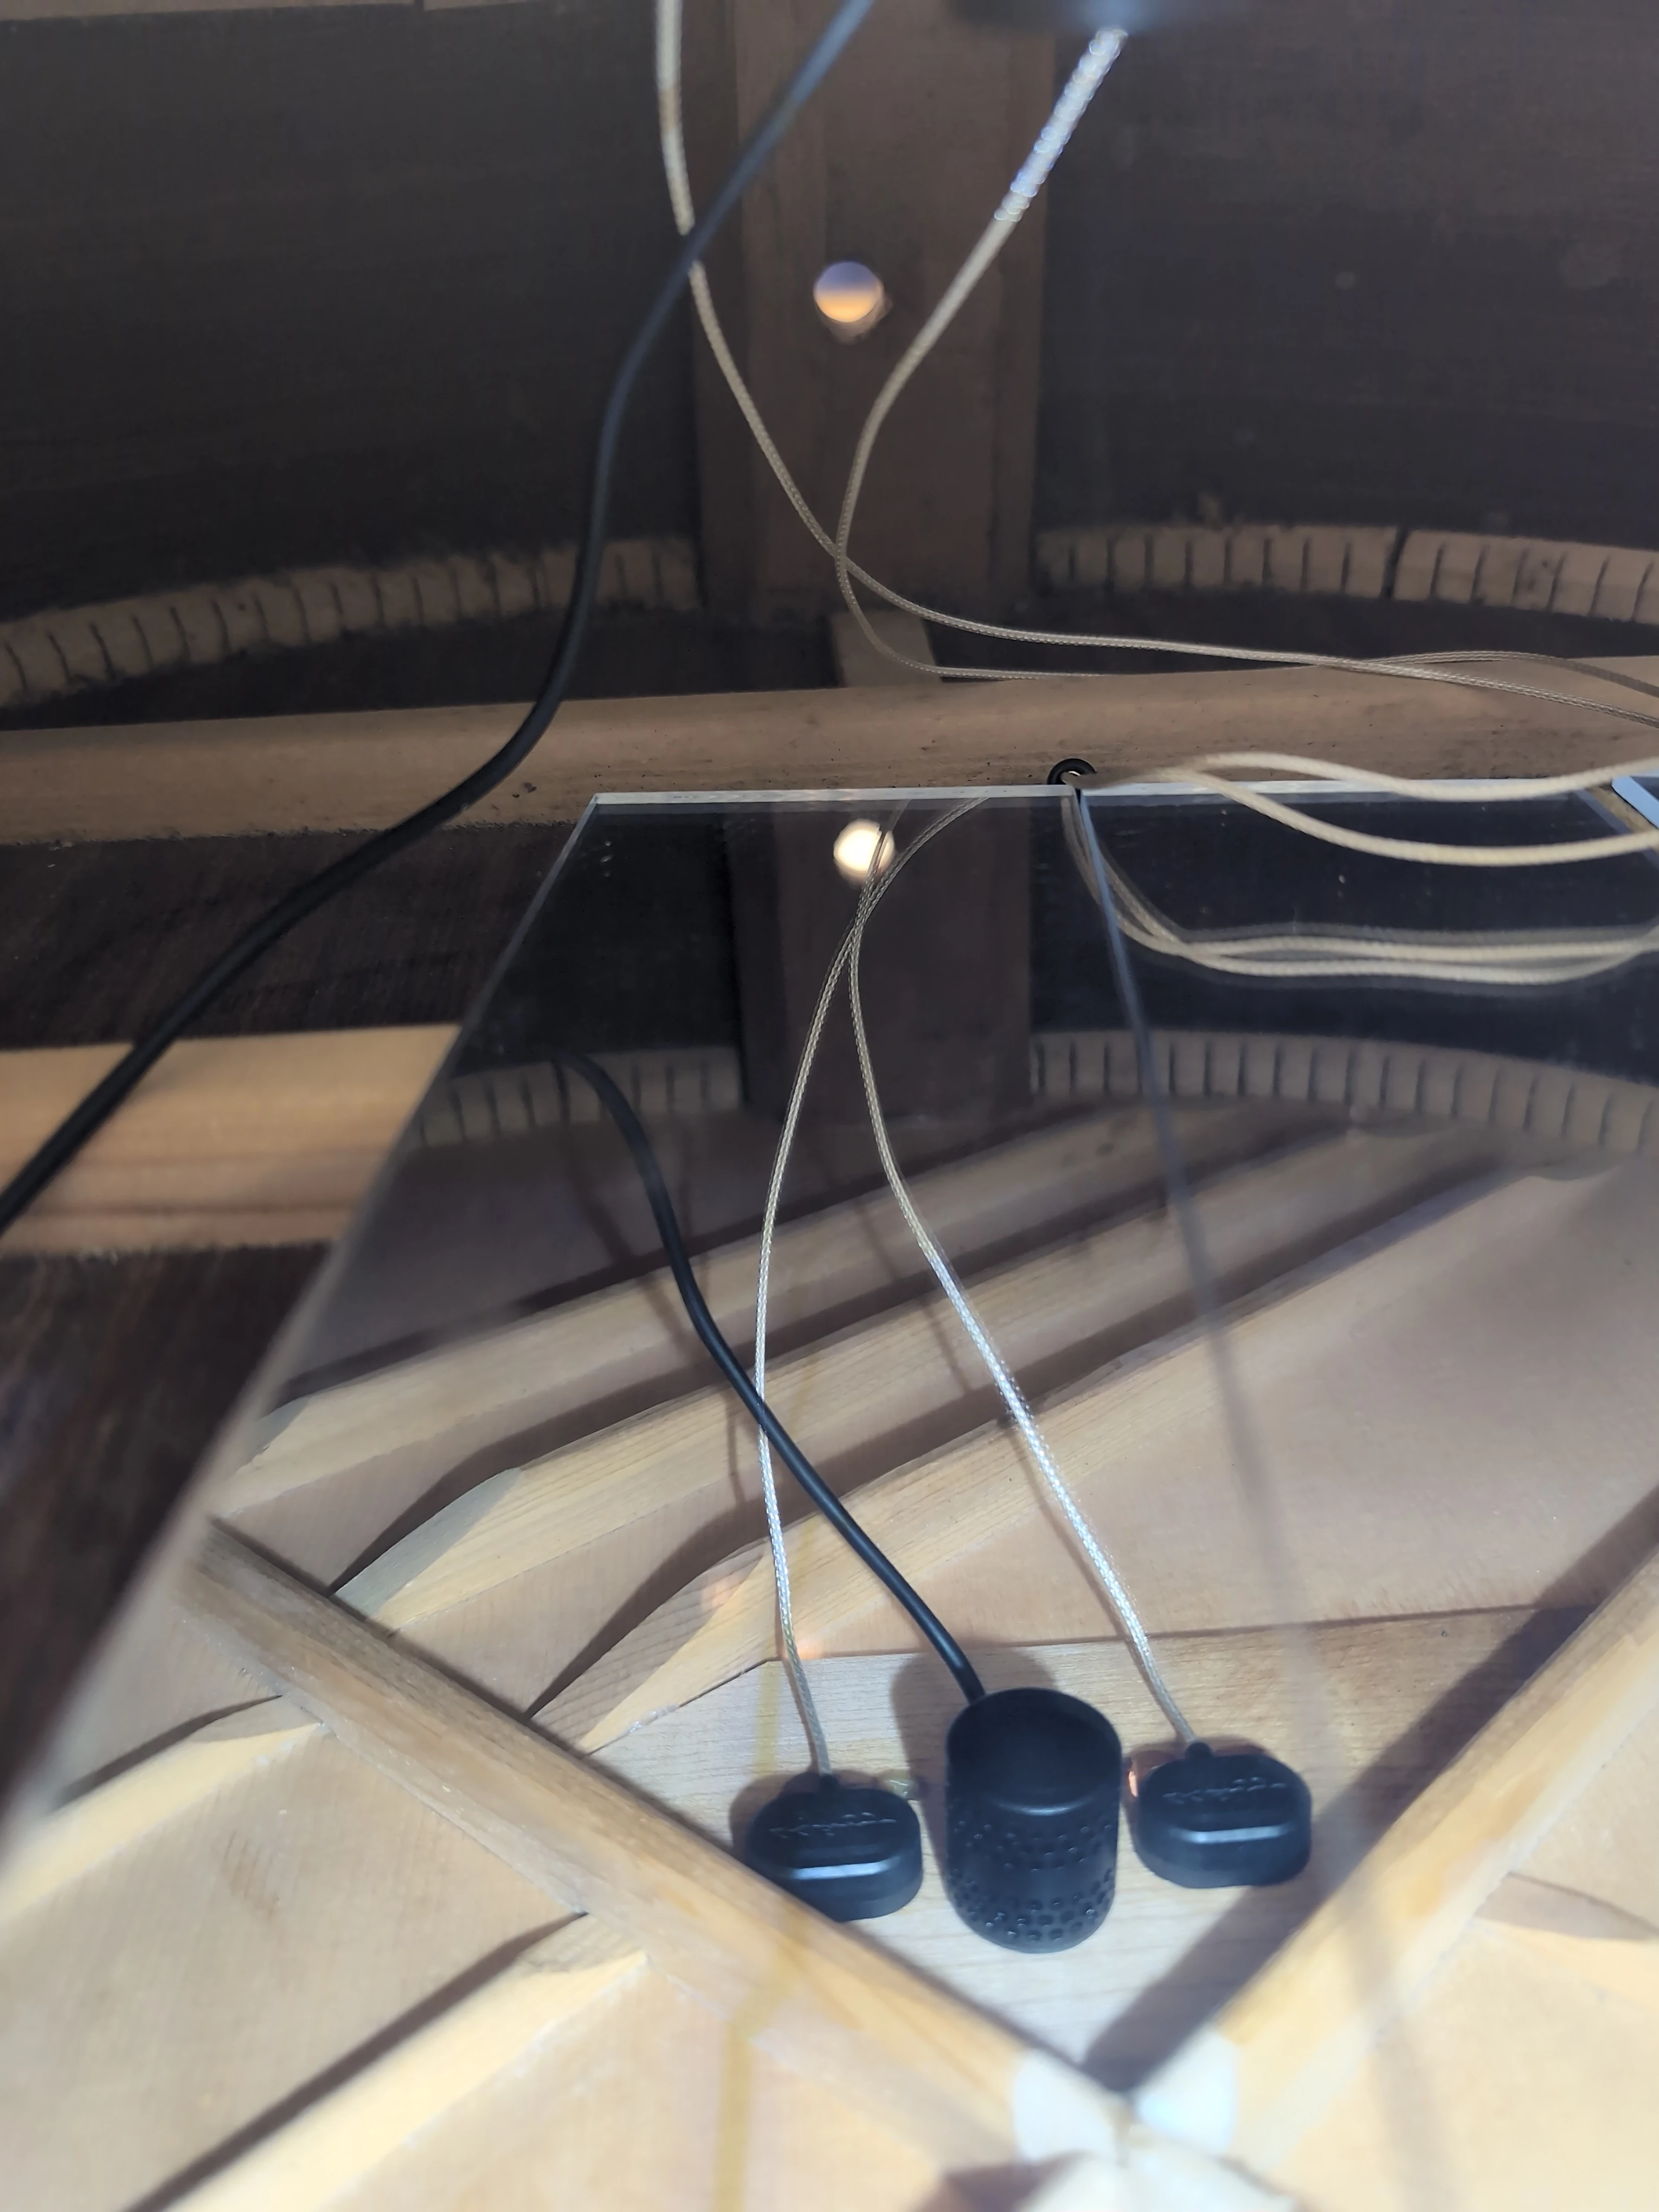
You may want to perform a "dry run": Lift the fixture, sensors, and wires up from the bridge and place the whole into the soundhole. With the fixture properly oriented, cradle it in your palm and carefully insert the posts (from the inside of the guitar) into their respective bridge pin holes.

TIP: Don't shove the plate upward from the inside. Instead, only insert the posts far enough so that you can pinch one of the protruding posts with your free hand, then remove your other hand from the soundhole to get a hold of the second post. Lift EVENLY to raise the sensors up against the bridgeplate.

Once you are comfortable with the process, remove the protective film from the adhesive already applied to the bottoms of each sensor, and perform the installation. Supporting the bridge with corresponding downward pressure, apply gentle pressure beneath each sensor, holding it for the count of five. Then pop the plate loose from the installed sensors, one at a time.

Cozad Guitars - LR Baggs HiFi Sensors Installed

Remove the fixture from the inside of the guitar and set it aside. LR Baggs recommends stringing up the guitar at this point to validate sensor placement. You can connect the sensors, strap jack, and battery cable to the preamp, in or outside the soundhole, for testing. The pressure sensitive adhesive makes a strong bond, and it is much easier to reposition these sensors BEFORE that bond is mature. If you do need to pull a sensor loose, it is recommended to use a new piece of adhesive.

Once the sensors are where they are supposed to be, press them again to complete the installation. Supporting the bridge with corresponding downward pressure, apply pressure directly to each sensor, holding it for fifteen seconds.

At this stage you now have a fully functional HiFi pickup system, albeit a bit overpriced if you were to stop, here. With the "Duet" model you have paid for additional features, so let's keep going.

The Duet part

How do I make a good sounding pickup system even better? By adding a mic, of course! Baggs built on their successful TRU-MIC platform, used in the Lyric and Anthem pickup systems, and introduced a new product they call the Silo Mic.

Cozad Guitars - LR Baggs Silo Mic

In their own words, "Silo employs a new microphone capsule and tuned suspension for enhanced ambience and dimension. It excels in providing isolation and feedback resistance, offering a plug-and-play performance in any environment. Its exceptional sound quality invites a confident comparison with your favorite studio microphones."

In my own words, "Using the Silo Mic, my guitars sound great. I am surprised by how feedback resistant the mic (the whole system) is!"

The Silo Mic relies on a manual installation devoid of templates or visual cues. As such, nailing perfect placement on your first try can be a bit daunting, but it is absolutely possible.

TIP: Insert two posts (dowels, golf tees, bolts, etc) into the bridge pin holes for the third (3rd) and fourth (4th) strings (the center two holes). The posts need to be long enough and fit snug enough that you can rest the Silo Mic up against them, inside the guitar, without shifting them out of place.

Cozad Guitars - LR Baggs Silo Mic and Positioning Posts

Reaching inside, use these two posts as a reference when determining placement of the mic. As with the sensors, the Silo Mic cable should also be positioned to run toward the tailblock. A "dry fit" can be especially helpful, so don't remove the protective film from the pre-applied adhesive until you are ready to stick the mic in place. The mic will reside centered between the first (1st) and sixth (6th) and, in the case of this guitar, slightly closer to the soundhole than the sensors. Remember: maintain clearances.

Cozad Guitars - LR Baggs Silo Mic Installed

The Rest of the Stuff

The strap jack needs a 1/2" hole through the tailblock (or equivalent).

The battery bag is a hook and loop design that comes with pre-applied adhesive. It is often placed onto the neck block. It is recommended to prepare any and all surfaces to which these pressure sensitive adhesives are applied by ensuring they are both smooth and clean (free of oils, dust, etc.).

Cozad Guitars - LR Baggs HiFi Duet Preamp

The preamp is a soundhole-mounted design that press fits against the underside of the soundboard. It has been molded to straddle low-profile soundhole bracing. Depending on the bracing design of your soundboard, your mileage may vary. The "Mix" wheel lets you dial from "all HiFi sensors/full-range/no mic" to "Silo Mic carries majority of the guitar's voice, with the HiFi supporting the low-end", and everything in between. A separate "Mic gain" control lets you achieve the right blend of low, mid, and high frequencies. A "Battery life" button and an overall "Volume" wheel round out the offering.

TIP: Make the connections of the components to the preamp PRIOR to attaching the preamp. In other words, plug in the strap jack, Silo Mic, HiFi, and Battery cable BEFORE you stick the preamp to the soundboard. Take the time to properly secure the wires of this system using the adhesive-backed wire stays provided with your purchase. The sensors, and especially the Silo Mic, will "hear" and amplify the sound of loose cables rattling around inside.

Considerations
  • The location of the braces in most fan-braced or Kasha-braced instruments may allow for placement of the HiFi sensors, but will likely prevent a successful installation of the Silo Mic.
  • Steel string guitars having extremely small bridgeplates (such as many of the early Martins) may not have sufficient space between the string holes and the X brace to accommodate the HiFi Duet.
  • Guitars featuring pinless bridges will require extra care and effort to achieve proper locating of all three components (but it CAN be done!).
  • Anything mounted to the bridgeplate (such as the JLD Bridge Doctor, or the TurboTail) may interfere with proper placement of the components of the HiFi Duet.

Impressions

The first guitar I installed an LR Baggs HiFi Duet into was a vintage Guild Rosewood jumbo. Plugged into a Bose L1 Model II, I couldn't get a howl out of the pickup. Put another way, I wasn't able to turn the volume up loud enough to get the pickup to feed back before the sound became too loud to continue testing. That was quite surprising! And very cool!

More importantly, the guitar sounded fantastic!

To me, "HiFi" is the appropriate name for the system, as "high fidelity" paints an immediate  picture in my mind of an articulate, accurate, artifact-free representation of live sound. And that is how I would describe my experience with the HiFi Duet.

You can read more about the LR Baggs HiFi Duet pickup at their website » LR Baggs.